Taming NSDocument and Understanding Who's Boss: Creating a Simple macOS Text Editor (Swift 3, Xcode 8 beta 6)
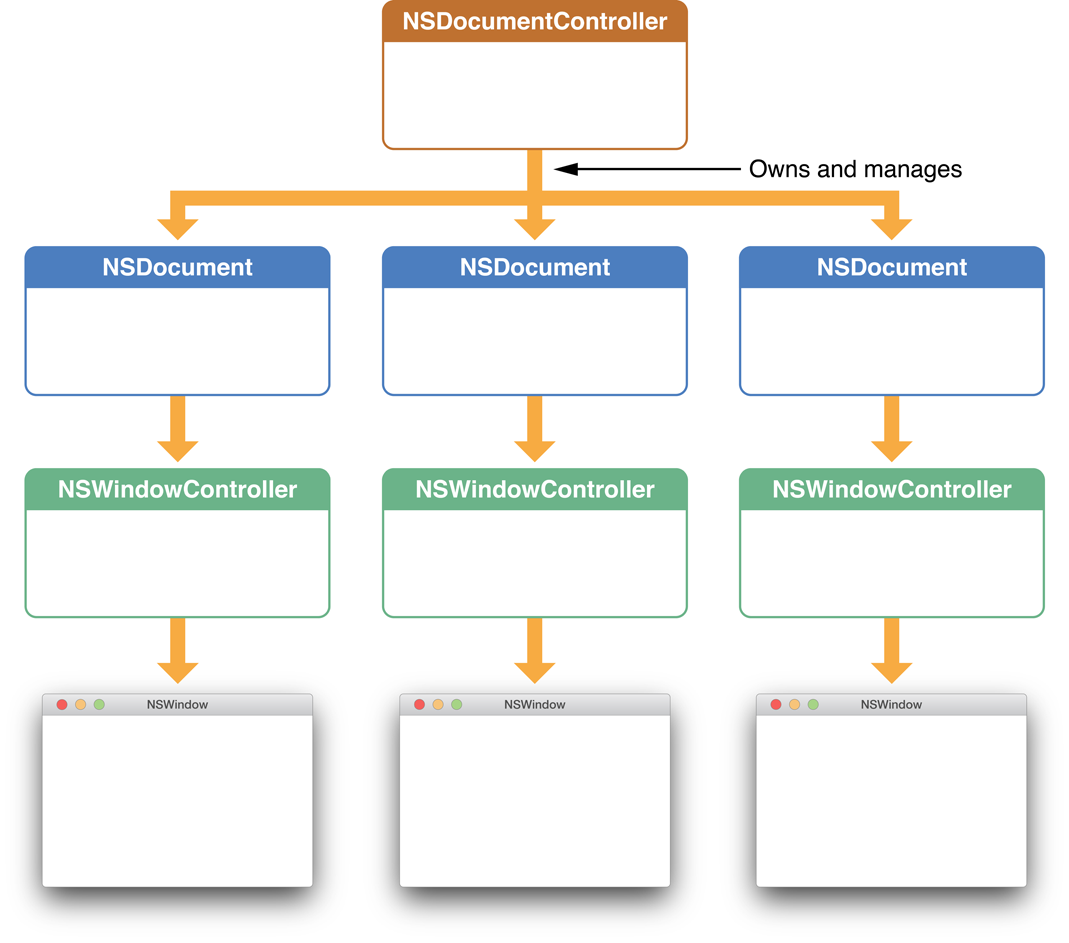
Looking at Apple's diagrams in their documentation we see that NSDocumentController is boss of NSDocument, which in turn is boss of NSWindowController and this leads to the document window being displayed. Yup, but what is really happening and what does this mean in terms of code?

And having clicked next, make sure you select the "Create Document-Based Application" checkbox:


The most important thing to note first of all is that:

Now we are ready to fulfil the reading and writing of data in our Document.

Creating the project
As with other apps, create a new project and select macOS Cocoa as the type:
And having clicked next, make sure you select the "Create Document-Based Application" checkbox:

Navigating the Files
When a document-based app is created alongside the familiar AppDelegate and ViewController files we have Document.swift as well. This final class file providing a subclass of NSDocument.
The most important thing to note first of all is that:
- the ViewController class does not own or create an instance of our NSDocument subclass (i.e. Document)
- the Document class does not own or create an instance of the NSViewController subclass (i.e. ViewController)
override func makeWindowControllers() {
    // Returns the Storyboard that contains your Document window.
    let storyboard = NSStoryboard(name: "Main", bundle: nil)
    let windowController = storyboard.instantiateController(withIdentifier: "Document Window Controller") as! NSWindowController
    self.addWindowController(windowController)
}
And in the Storyboard we see how everything is nested:
The Window Controller that is instantiated in makeWindowControllers contains a Window that in turn contains a View Controller.
Adding a Text View
We can add a text view to the View Controller by dragging one out in the storyboard, adding constraints (using the triangular add missing constraints button at the bottom right of the storyboard) and linking to the ViewController class as an outlet (and naming it for the purposes of this tutorial: textView). But here we hit the first issue: how do we get a reference to the text contained in the Text View that we just added from inside the Document class?
This happens by adding two lines of code to the makeWindowsController method:
let vc = windowController.contentViewController as! ViewController
vc.textView.string = string
and also a class property to the Document class as well:
var string = ""The string property is added for loading and creating new files. The reason for this is because at initialisation the Text View hasn't been created and so if we were to pass the data received from the NSDocument read method straight into the text view of the view controller then a crash would occur, so we put the text into a string first and then leave it there until the window appears because it is only at this stage that the view controller and its view are in place.
Now we are ready to fulfil the reading and writing of data in our Document.
Reading File Data
For simplicity I'm going to assume that we'll only be receiving UTF8 encoded strings for now.override func read(from data: Data, ofType typeName: String) throws {
if let s = String(data: data, encoding: String.Encoding.utf8) {
string = s
}
}
The data is transformed into a string and then saved to the document string property. As explained this string is not sent directly to the text view otherwise it would crash the app.
Writing File Data
Writing file data is not too much trouble either, we just need a reference to the view controller and its text view and then to return the string within it as Data. The NSDocumentController does the rest (and we don't even need to worry about subclassing or instantiating it).override func data(ofType typeName: String) throws -> Data {
if let vc = self.windowControllers[0].contentViewController as? ViewController {
return vc.textView.string?.data(using: String.Encoding.utf8) ?? Data()
}
else {
return Data()
}
}
As we see from the opening diagram the NSDocument subclass creates an NSWindowController, which in turn displays a window. Hence a reference to the window and its view controller is always possible to obtain. But it should be noted that we are assuming here that there is only one window controller (NSWindowController) present. If the app is more complex and there is reason to believe that this is not the case then this needs to be negotiated.
Document Class (NSDocument subclass)
The entire code for the Document class looks like this:import Cocoa
class Document: NSDocument {
var string = ""
override class func autosavesInPlace() -> Bool {
return true
}
override func makeWindowControllers() {
// Returns the Storyboard that contains your Document window.
let storyboard = NSStoryboard(name: "Main", bundle: nil)
let windowController = storyboard.instantiateController(withIdentifier: "Document Window Controller") as! NSWindowController
self.addWindowController(windowController)
let vc = windowController.contentViewController as! ViewController
vc.textView.string = string
}
override func data(ofType typeName: String) throws -> Data {
if let vc = self.windowControllers[0].contentViewController as? ViewController {
return vc.textView.string?.data(using: String.Encoding.utf8) ?? Data()
}
else {
return Data()
}
}
override func read(from data: Data, ofType typeName: String) throws {
    if let s = String(data: data, encoding: String.Encoding.utf8) {
        string = s
    }
}
}
ViewController Class (NSViewController subclass)
The ViewController itself is stupidly simple in this example:import Cocoa
class ViewController: NSViewController {
@IBOutlet var textView: NSTextView!
}
Testing the app
Believe it or not the app is now a functioning text editor that can be used to open and save files created within the app and by adding an Imported UTI type (to Targets -> App -> Info) we can also open text files created elsewhere:
The information required to complete the imported UTI types can be found in the Apple Documentation. Note: for this to fully function we'd need to update the code here to handle the most common text formats (currently we're only supporting UTF8) but I'll leave things here for now.
Hi, Just started with swift.
ReplyDeleteWhat happend with the default throws code when I create a new document based project? It is removed from your sample code.
Also how to create the dirty flag?
Thank you
thank you for this!
ReplyDeleteDo you have time to expand on this and detail how we can create/open a custom file format please?
Great tutorial! Easy to follow. Thanks a lot!
ReplyDeleteGreat tutorial! Thank you.
ReplyDelete