This is the first of a series of posts looking at common scenarios in Auto Layout. Starting with the most basic and working outwards.
Where to begin
The number one rule as an absolute beginner with Auto Layout is to keep it simple. Begin with your storyboard. Do not attempt to grasp Auto Layout from code alone. And most of all experiment slowly.In all of the examples, I recommend building and running on an iPad (or iPad simulator) in the first instance before testing on an iPhone. The reason for this will become clear as this post and the series of posts progresses.
Essentially we need to think in Auto Layout, which at first is rarely intuitive, but once the logic is grasped everything becomes much simpler to understand.
First steps: A view in the centre of the screen
1. Drag out a view and place it at the centre of your view.2. Without resizing the view change the background colour so that it's visible.
2. With the new view selected, from the four icons at the bottom right of the storyboard click on the second one.
3. Check 'Horizontally in Container' and 'Vertically in Container' as shown in the figure below.

4. Click the button at the bottom that reads 'Add 2 Constraints'.
5. You can now build and run and your view will remain centred. But don't leave us just yet, because there's more information to follow that you need to know about.
Second steps: Fill the screen with a view
1. Using the same storyboard select the view you added.2. Click on the third icon on the bottom right.
3. Enter the number 5 inside the top field and the top left field as shown below.
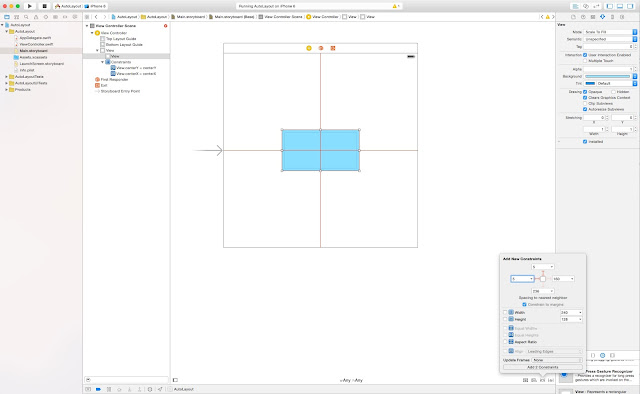
4. Click on 'Add 2 Constraints'.
5. Before we're ready to build and run go to the Editor menu and select Resolve Auto Layout Issues.
6. Click on 'Update Frames' as shown. (Note: an alternative to step 5. is to click the fourth icon in the bottom right corner of the storyboard.)

7. The view will now expand to fill the superview.

8. Build and run. You will see that the view fills the screen leaving the same margin all the way around.
Further experimentation
Constraints can be deleted by clicking on them and then pressing delete. Try deleting the constraints added to connect the view to the top and left (or leading) edges in steps 3 and 4 ('Second steps: Fill the screen with a view'). Do this either by deleting both at the same time (or removing them one at a time) to see the effect.
You'll see that the edge that isn't constrained will retain its original dimension whereas the constrained side will stretch outwards in both directions equally from the centre. You might also notice that when the constraints are removed a warning appears to inform us that 'position and size are ambiguous'. And in fact if we look back at the first example, we had a similar warning there as well. So let's look again at what we should've done to silence that warning (and remove the ambiguity).
You'll see that the edge that isn't constrained will retain its original dimension whereas the constrained side will stretch outwards in both directions equally from the centre. You might also notice that when the constraints are removed a warning appears to inform us that 'position and size are ambiguous'. And in fact if we look back at the first example, we had a similar warning there as well. So let's look again at what we should've done to silence that warning (and remove the ambiguity).
Responding to warnings
To look at what the compiler wants from us:
1. First of all clear all the constraints using the fourth icon along the bottom right of the storyboard (Clear Constraints option).
2. Shrink the added view to near its original size and move it into the exact centre of the superview using the guides that appear as you position it.
3. Now control + click and drag from the view towards the left (or leading) edge of the superview and let go, selecting the very top option from the box that appears. (This is a shortcut to achieve the same thing as when constraints were added using the third icon along the bottom right of the storyboard.)
4. Do the same control + click and drag towards the top of the superview and again select the top option. (Note: you don't need to drag to the extremity of the view, simply a little in the direction you wish will do.)
5. A warning symbol should appear.
6. Click on the fourth icon along the bottom right of the storyboard pane again.
7. This time select 'Add Missing Constraints'.
8. If you positioned the view in the absolute centre of the superview you will see that alignment constraints are added to centre the view horizontally and vertically. If you don't see this, undo and centre the view properly before trying again.
9. Great, now undo so that the alignment constraints are removed and reposition the view off-centre. Now go back to the fourth icon along the bottom right and select 'Add Missing Constraints' again.
10. Something different should've happened. Now you have constraints leading off every edge as below.

Resizing not required
Perhaps this reshaping and reorientation of the view wasn't really what we wanted even though that's the fix that Xcode offered. That's OK, we can deal with that.
1. Delete the right (or trailing) restraint and the bottom restraint.
2. Select the view and then tap the icon that is the third along the bottom right of the storyboard.
3. Check the Width and Height boxes shown below.

4. Click the 'Add 2 Constraints' button.
5. Build and run to see you view with the fixed dimensions.
Note: Simulating (or running) this on an iPad the results seem predictable if you locate the view as I have above. However, if you try running this example on an iPhone then everything might feel a bit randomly located. In fact, there's nothing random about the appearance on the iPhone but because we've fixed the dimensions of the view it will be remain the same size as on the iPad even though the screen is smaller. Not only this but the spacing from the top edge and the spacing from the left edge will also remain the same. The iPhone does not take what we see in the storyboard and shrink it proportionally to fit the iPhone screen, instead it sees only the length and width of our constraints along with any other information (which here includes the width and height). For example, if we did not set the width but set the left and right constraints so that their sum was more than the width of the iPhone screen, then the view between the constraints would be flattened into non-existence because its width would be then in the minus numbers. The thing to remember in this instance is that if you're going to fix the width and/or height of a subview then you need to ensure that your constraints do not then force it off the screen by being too long or wide.
Note: Simulating (or running) this on an iPad the results seem predictable if you locate the view as I have above. However, if you try running this example on an iPhone then everything might feel a bit randomly located. In fact, there's nothing random about the appearance on the iPhone but because we've fixed the dimensions of the view it will be remain the same size as on the iPad even though the screen is smaller. Not only this but the spacing from the top edge and the spacing from the left edge will also remain the same. The iPhone does not take what we see in the storyboard and shrink it proportionally to fit the iPhone screen, instead it sees only the length and width of our constraints along with any other information (which here includes the width and height). For example, if we did not set the width but set the left and right constraints so that their sum was more than the width of the iPhone screen, then the view between the constraints would be flattened into non-existence because its width would be then in the minus numbers. The thing to remember in this instance is that if you're going to fix the width and/or height of a subview then you need to ensure that your constraints do not then force it off the screen by being too long or wide.
Conclusion
I'm planning for next time to look at handling two views at once, one inside the other. Once again moving slowly through the procedure so that we know how to fix errors and get the results we are looking for.

Hi Thanks for this.
ReplyDeleteIt would greatly help if you could say WHY you enter the '5' in the top field. Mine is tall and skinny and I'm getting nervous about his autolayout.
It's best explained if you keep reading the series http://sketchytech.blogspot.co.uk/search/label/Fear%20and%20Loathing%20in%20Auto%20Layout
Delete