Returning to our earlier document from the last post on XML authoring:
that we saved with the .xml extension, we are ready to import it into InDesign.
In your blank InDesign document click on the File menu and select 'Import XML...', which is about halfway down the menu.
For the purposes of this tutorial, I'll assume you already know how to open InDesign and create a new document. You don't have to be using the latest and greatest version of InDesign. Here I'm using the version packaged with CS3.
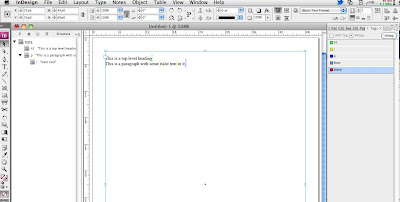
When you open the file a structure panel should open on the left of your document. From here drag and drop the "story" you created to your page and then treat it as you would a placed Word doc.

The Structure can be viewed at any time using the View menu. (View > Structure > Show Structure).
You can apply, remove and create new XML tags using Tags from the Window menu (Window > Tags) just as you would paragraph and character styles.
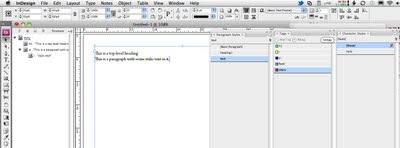
At present you will notice that your text is merely tagged and not styled at all. In order to style we need some paragraph and character styles. Most likely you will already have these from earlier work you have produced. If this is the case select the menu at the top of the Paragraph Styles window and choose "Load All Text Styles ..." then select the file with the styles you wish to copy and load them.
In the most basic form our windows (or panels) will start to look like this:

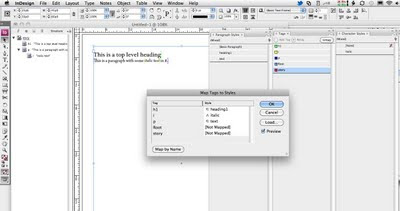
Next we want to link the styles and tags together so that the XML tags are automatically styled in our InDesign document, because this will save oodles of time once our workflow is up and running. In order to do this select the menu at the top of the Tags window and choose "Map Tags to Styles" and assign each XML tag a corresponding InDesign "style". Finish by clicking OK. You can check the preview box here to see it in action as you go.

All of this is only the beginning. These are the basics from which to build your XML empire. Also of interest will be the option to go from InDesign document to XML using "Map Styles to Tags", but space and time has run out. So I'll end there for now. Please post any questions, comments or queries below.
Between my former post on XML and this one, there has been a blogpost by @carijansen exploring the basics of working with XML and InDesign, which covers much of the ground that I examine here.
<story>
<h1>This is a top level heading</h1>
<p>This is a paragraph with some <i>italic text</i> in it.</p> </story>
<h1>This is a top level heading</h1>
<p>This is a paragraph with some <i>italic text</i> in it.</p> </story>
that we saved with the .xml extension, we are ready to import it into InDesign.
In your blank InDesign document click on the File menu and select 'Import XML...', which is about halfway down the menu.
For the purposes of this tutorial, I'll assume you already know how to open InDesign and create a new document. You don't have to be using the latest and greatest version of InDesign. Here I'm using the version packaged with CS3.
When you open the file a structure panel should open on the left of your document. From here drag and drop the "story" you created to your page and then treat it as you would a placed Word doc.

The Structure can be viewed at any time using the View menu. (View > Structure > Show Structure).
You can apply, remove and create new XML tags using Tags from the Window menu (Window > Tags) just as you would paragraph and character styles.
At present you will notice that your text is merely tagged and not styled at all. In order to style we need some paragraph and character styles. Most likely you will already have these from earlier work you have produced. If this is the case select the menu at the top of the Paragraph Styles window and choose "Load All Text Styles ..." then select the file with the styles you wish to copy and load them.
In the most basic form our windows (or panels) will start to look like this:

Next we want to link the styles and tags together so that the XML tags are automatically styled in our InDesign document, because this will save oodles of time once our workflow is up and running. In order to do this select the menu at the top of the Tags window and choose "Map Tags to Styles" and assign each XML tag a corresponding InDesign "style". Finish by clicking OK. You can check the preview box here to see it in action as you go.

All of this is only the beginning. These are the basics from which to build your XML empire. Also of interest will be the option to go from InDesign document to XML using "Map Styles to Tags", but space and time has run out. So I'll end there for now. Please post any questions, comments or queries below.
Between my former post on XML and this one, there has been a blogpost by @carijansen exploring the basics of working with XML and InDesign, which covers much of the ground that I examine here.
You might be interested in my blog post that, among other things, discusses the limitations of InDesign’s style/tag mapping. This kind of mapping doesn’t work straightforwardly (i.e., without more or less complex transformations) for document types with section hierarchies or different paragraph classes, such as TEI.
ReplyDeleteAlternative approaches (aid:… attribute mapping, IDML synthesis) entail their own drawbacks. With these approaches, it’s laborious and error-prone to keep tags and formatting in sync when carrying out author corrections on already tagged content in InDesign.
Gerrit,
ReplyDeleteThank you for your comment. I think we might be coming at the same thing from different directions. Although your knowledge I have to admit is stronger.
There are people I know who have been using InDesign for far longer than me and only just learnt how to place a Word doc and take advantage of Word's styles. So here I'm trying to simplify things and show that XML isn't scary.
Further, my larger aim is to show that we can make content less InDesign dependent and pave the way for flexibility on the programs we use in publishing, because like you I don't think it is always the best solution - especially for eBooks.