Mirror margins make a print book (or journal) look attractive, but when they are retained in the online PDF they can make you feel a little seasick when you flick between pages because they shift left and right on the screen. So how do you remove them without going back to InDesign and changing things around?
Simple:
(1) Work out the difference between your margins.
(2) Crop this amount from the pages in Adobe Acrobat
(3) Save in a reduced file size
As a demonstration:

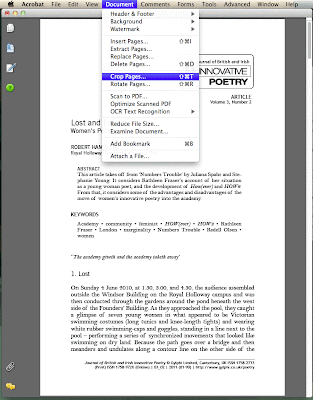
Here's a PDF with inside margins of 19 mm and outside margins of 23 mm (these are quite generous but well suited to a journal with a trim size of 234 mm x 156 mm, which is otherwise known as Royal). You'll notice that I've navigated to the document menu already and I'm hovering over "Crop…". You'll need to do the same and click.
Next you'll see this dialogue box:

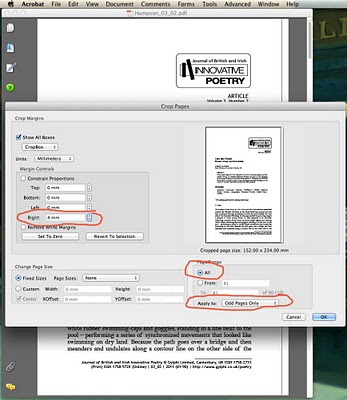
I've added the red circles to indicate the things you'll need to change. First, you need to set an amount that will balance up your margins: for me this is 4 mm, (since 23 mm minus 19 mm equals 4 mm). It is in the box labelled "Right" because as you'll see in the live preview box the cropping line is coming in from the right, which is the "outside" margin for each odd page, and as you will also see I've selected "All" and "Odd Pages Only" in the "Page Range" section of the dialog box (which means only the recto pages will be trimmed). Next click OK.
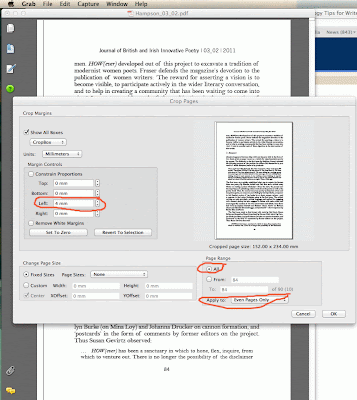
You'll then need to repeat the first stage, selecting again "Crop …" from the "Document" menu. This time you'll be cropping the left-hand (or verso) pages, so they will be even, and things will look like this:

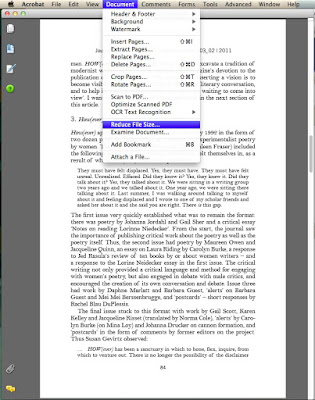
Again press OK and you're done. If this is the full size press ready files then you will probably also want to reduce the file size for uploading to the web. In which case you'll need to go to the "Document" menu again and select "Reduce File Size …"

From there follow the instructions. If you can't get the files to reduce as much as you'd like then it might be necessary to save at the smallest size from InDesign before you start.
Simple:
(1) Work out the difference between your margins.
(2) Crop this amount from the pages in Adobe Acrobat
(3) Save in a reduced file size
As a demonstration:

Here's a PDF with inside margins of 19 mm and outside margins of 23 mm (these are quite generous but well suited to a journal with a trim size of 234 mm x 156 mm, which is otherwise known as Royal). You'll notice that I've navigated to the document menu already and I'm hovering over "Crop…". You'll need to do the same and click.
Next you'll see this dialogue box:

I've added the red circles to indicate the things you'll need to change. First, you need to set an amount that will balance up your margins: for me this is 4 mm, (since 23 mm minus 19 mm equals 4 mm). It is in the box labelled "Right" because as you'll see in the live preview box the cropping line is coming in from the right, which is the "outside" margin for each odd page, and as you will also see I've selected "All" and "Odd Pages Only" in the "Page Range" section of the dialog box (which means only the recto pages will be trimmed). Next click OK.
You'll then need to repeat the first stage, selecting again "Crop …" from the "Document" menu. This time you'll be cropping the left-hand (or verso) pages, so they will be even, and things will look like this:

Again press OK and you're done. If this is the full size press ready files then you will probably also want to reduce the file size for uploading to the web. In which case you'll need to go to the "Document" menu again and select "Reduce File Size …"

From there follow the instructions. If you can't get the files to reduce as much as you'd like then it might be necessary to save at the smallest size from InDesign before you start.
Comments
Post a Comment