So far this series of posts has examined the scenario where a view is on its own and a view is within a view. Now it examines placing two views side by side.
I want to start with the scenario of a pair of views that remain equal in width and height.
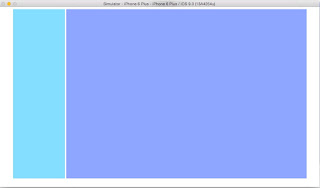
Both views remain equal widths and heights
1. Place two views side by side
2. For each view, control + click and drag (or three finger drag) out constraints for three of the sides, excluding the edge closest to the view next to it. Letting go of the drag each time and select the top option each time. (these will read: Vertical Spacing to Top Layout Guide, Leading Space to Container Margin, Trailing Space to Container Margin, Vertical Spacing to Top Layout Guide)
3. Now drag out a constraint between the two views and select the top option once again (i.e. Horizontal Spacing)
4. Next select both views at the same time
5. Click on the third icon along the row of bottom right icons in the storyboard pane
6. Check 'Equal Widths' and 'Equal Heights' and then click 'Add 2 Constraints'

7. Your storyboard should now look something like this:

7. Your storyboard should now look something like this:
8. Build and run. The results should be predictable on iPhone and iPad variants.
Right view resizes, left remains static width
To achieve a relationship between views where the one on the left stretches to fill the space but the one on the right remains static in width across iPhone and iPad sizes do the following:
1. Place one view, which is roughly a quarter of the width of superview (and the full height), on the left side
2. Place a view from near the edge of the first view and stretch it to the right of the screen, so that they appear like so:

3. For each view, control + click and drag (or three finger drag) out constraints for three of the sides, excluding the edge closest to the other view. Letting go of the drag and selecting the top option each time.
2. Place a view from near the edge of the first view and stretch it to the right of the screen, so that they appear like so:
3. For each view, control + click and drag (or three finger drag) out constraints for three of the sides, excluding the edge closest to the other view. Letting go of the drag and selecting the top option each time.
4. Now drag out a constraint between the two views and select the top option as usual.
5. Next drag out a constraint from the rightmost view past the left view to the left (or leading) edge of the superview.
6. Build and run.
Your results should look like this:

 On iPad and iPhone results should be equally predictable. And the process can be simply inverted to have a view on the left that resizes and on the right that is static in width. The thing to remember as always is that it is the constraint that is more important than the apparent size of the views within the storyboard (when building for any screen size).
Your results should look like this:
and this when orientated:
Further ideas
Combining knowledge from this post with the previous one, you should now be able to place views inside the subviews. Here the (white) subview on the left is constrained to every edge of its superview and the one on the right is constrained to all but the top edge and has Aspect Ratio applied:


It is even possible to add a third view with little effort:
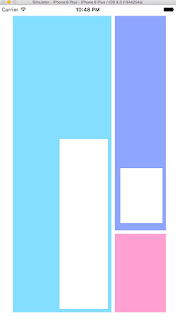
 The pink view is then added and it is constrained against the superview bottom and right, the blue view to the left and the purple view to the top.
Here the purple view is shifted up along with its (white) subview and the constraints of both shifted views updated using the fourth icon along on the bottom right of the storyboard pane.
Conclusion
We've come a long way and if you've read the posts carefully and followed the examples then you should by now feel a sense of newfound superpowers, but there's still more to look at in the world of Auto Layout. This includes Hugging Priority and Compression Resistance and varying constraints based on size classes, not to mention thinking about how we start to replicate this behaviour in code.
The plan from here is to look at size classes next and how we provide different views for different devices and orientations, so that an iPhone might in portrait have a single view, while in landscape might have two. Or there might be a view controller with one view universal to all devices and orientations and then different views added in depending on device and orientation. Don't worry if this sounds complicated, all will become clear in the posts that follow.
The plan from here is to look at size classes next and how we provide different views for different devices and orientations, so that an iPhone might in portrait have a single view, while in landscape might have two. Or there might be a view controller with one view universal to all devices and orientations and then different views added in depending on device and orientation. Don't worry if this sounds complicated, all will become clear in the posts that follow.

Comments
Post a Comment